Flink Execution Graph

延續上篇Job Graph產生,此篇說明Execution Graph生成的過程與目的

Client Submit Job Graph

ClusterClient的程序中,取得JobGraph後,會呼叫其實現類RestClusterClient<T>的submitJob(…),在此方法中會透過HTTP POST的方式將JobGraph提交給Dispatcher

ClusterClient @org/apache/flink/client/program/ClusterClient.java

1
2
3
4
5
6
7
8
public abstract class ClusterClient<T> {
public JobSubmissionResult run(FlinkPlan compiledPlan,
List<URL> libraries, List<URL> classpaths, ClassLoader classLoader, SavepointRestoreSettings savepointSettings)
throws ProgramInvocationException {
JobGraph job = getJobGraph(flinkConfig, compiledPlan, libraries, classpaths, savepointSettings);
return submitJob(job, classLoader);
}
}

RestClusterClient @org/apache/flink/client/program/rest/RestClusterClient.java

1
2
3
4
5
6
7
8
9
public class RestClusterClient<T> extends ClusterClient<T> implements NewClusterClient {
@Override
public JobSubmissionResult submitJob(JobGraph jobGraph, ClassLoader classLoader) throws ProgramInvocationException {
log.info("Submitting job {} (detached: {}).", jobGraph.getJobID(), isDetached());
final CompletableFuture<JobSubmissionResult> jobSubmissionFuture = submitJob(jobGraph);
// ...
}

Start Standalone Cluster

這裡須先說明Standalone的Dispatcher是如何執行的,以及其入口類
在啟動Standalone mode時,是透過start-cluster.sh啟動,透過jobmanager.sh最終調用flink-daemon.sh,並使用org.apache.flink.runtime.entrypoint.StandaloneSessionClusterEntrypoint作為入口類,將Standalone Cluster啟動

1
2
3
4
5
6
7
8
9
10
11
12
13
14
15
16
17
18
19
20
21
public class StandaloneSessionClusterEntrypoint extends SessionClusterEntrypoint {
public StandaloneSessionClusterEntrypoint(Configuration configuration) {
super(configuration);
}
@Override
protected DispatcherResourceManagerComponentFactory<?> createDispatcherResourceManagerComponentFactory(Configuration configuration) {
return new SessionDispatcherResourceManagerComponentFactory(StandaloneResourceManagerFactory.INSTANCE);
}
public static void main(String[] args) {
// ...
Configuration configuration = loadConfiguration(entrypointClusterConfiguration);
StandaloneSessionClusterEntrypoint entrypoint = new StandaloneSessionClusterEntrypoint(configuration);
ClusterEntrypoint.runClusterEntrypoint(entrypoint);
}
}

進入ClusterEntrypoint.runClusterEntrypoint(…)後,會走到ClusterEntrypoint的runCluster(…),此時會透過實現類StandaloneSessionClusterEntrypoint的createDispatcherResourceManagerComponentFactory(…),取得dispatcherResourceManagerComponentFactory,故dispatcherResourceManagerComponentFactory為SessionDispatcherResourceManagerComponentFactory object。
接著透過dispatcherResourceManagerComponentFactory.create(…),在SessionDispatcherResourceManagerComponentFactory的父類AbstractDispatcherResourceManagerComponentFactory會初始化Dispatcher REST endpoint、Resource Manager,Dispatcher,等待Client端提交Flink job

1
2
3
4
5
6
7
8
9
10
11
12
13
14
15
16
17
18
19
20
21
22
23
24
25
public abstract class ClusterEntrypoint implements AutoCloseableAsync, FatalErrorHandler {
private void runCluster(Configuration configuration) throws Exception {
synchronized (lock) {
initializeServices(configuration);
// ...
final DispatcherResourceManagerComponentFactory<?> dispatcherResourceManagerComponentFactory = createDispatcherResourceManagerComponentFactory(configuration);
clusterComponent = dispatcherResourceManagerComponentFactory.create(
configuration,
commonRpcService,
haServices,
blobServer,
heartbeatServices,
metricRegistry,
archivedExecutionGraphStore,
new AkkaQueryServiceRetriever(
metricQueryServiceActorSystem,
Time.milliseconds(configuration.getLong(WebOptions.TIMEOUT))),
this);
// ...
}
}
}

Receive Client Request

根據FLIP-6

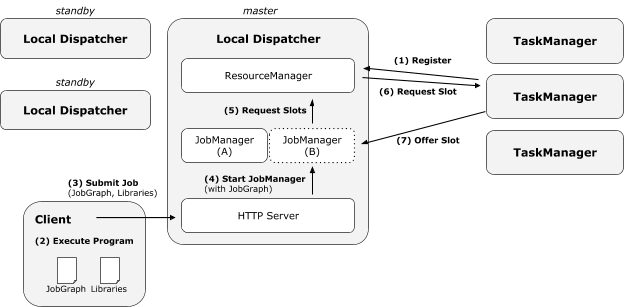
透過HTTP上傳至Dispatcher @StandaloneDispatcher的父類Dispatcher

1
2
3
4
5
6
7
8
9
10
11
12
13
14
15
16
17
18
public abstract class Dispatcher extends FencedRpcEndpoint<DispatcherId> implements
DispatcherGateway, LeaderContender, SubmittedJobGraphStore.SubmittedJobGraphListener {
@Override
public CompletableFuture<Acknowledge> submitJob(JobGraph jobGraph, Time timeout) {
log.info("Received JobGraph submission {} ({}).", jobGraph.getJobID(), jobGraph.getName());
try {
if (isDuplicateJob(jobGraph.getJobID())) {
return FutureUtils.completedExceptionally(
new JobSubmissionException(jobGraph.getJobID(), "Job has already been submitted."));
} else {
return internalSubmitJob(jobGraph);
}
} catch (FlinkException e) {
return FutureUtils.completedExceptionally(e);
}
}
}

Dispatcher會啟動JobMasterJobMaster會開始Build ExecutionGraph

1
2
3
4
5
6
7
8
9
10
11
12
13
14
15
16
17
18
19
20
21
22
23
24
25
26
27
28
29
30
31
32
33
34
35
public class JobMaster extends FencedRpcEndpoint<JobMasterId> implements JobMasterGateway, JobMasterService {
public JobMaster(...) throws Exception {
// ...
this.executionGraph = createAndRestoreExecutionGraph(jobManagerJobMetricGroup);
// ...
}
private ExecutionGraph createAndRestoreExecutionGraph(JobManagerJobMetricGroup currentJobManagerJobMetricGroup) throws Exception {
ExecutionGraph newExecutionGraph = createExecutionGraph(currentJobManagerJobMetricGroup);
// ...
return newExecutionGraph;
}
private ExecutionGraph createExecutionGraph(JobManagerJobMetricGroup currentJobManagerJobMetricGroup) throws JobExecutionException, JobException {
return ExecutionGraphBuilder.buildGraph(
null,
jobGraph,
jobMasterConfiguration.getConfiguration(),
scheduledExecutorService,
scheduler,
userCodeLoader,
highAvailabilityServices.getCheckpointRecoveryFactory(),
rpcTimeout,
restartStrategy,
currentJobManagerJobMetricGroup,
blobWriter,
jobMasterConfiguration.getSlotRequestTimeout(),
log);
}
}

Build Execution Graph

ExecutionGraphBuilder.buildGraph(…)當中Execution Graph的建立流程在attachJobGraph function中,主要分成2個步驟

  1. new ExecutionJobVertex(…) @org/apache/flink/runtime/executiongraph/ExecutionJobVertex.java
    • 將已排序的JobVertex拓墣,建立對應的ExecutionJobVertex
      • 拓墣保證如果在節點A->B中存在有向邊,那麼排序後節點A肯定在B之前
      • 一個JobVertex對應一個ExecutionJobVertex
    • 創建N個IntermediateResult
      • N為對應的JobVertexIntermediateDataSet的數量
      • 每一個IntermediateResult都有parallelism個生產者,對應parallelism個IntermediateResultPartition
    • 創造M個ExecutionVertex
      • M為對應的parallelism
      • ExecutionEdge是其的輸入,IntermediateResultPartition是其的輸出
        • IntermediateResultPartition表示ExecutionVertex的一個輸出分區
  2. ejv.connectToPredecessors(this.intermediateResults)
    • ExecutionJobVertex的上下游關西建立,並將其連接
    • 每一個ExecutionJobVertex都會和上游的IntermediateResult建立連接,生成ExecutionEdge

參考官方文檔說明JobManager轉換Job Graph到Execution Graph的過程

1
2
3
4
5
6
7
8
9
10
11
12
13
14
15
16
17
18
19
20
21
22
23
24
25
26
27
28
29
30
31
32
33
34
35
36
37
38
39
40
41
42
43
44
45
46
47
48
49
50
51
52
53
54
55
56
57
58
59
60
61
62
63
64
65
66
67
68
69
70
71
72
73
74
75
76
77
78
79
80
81
82
83
84
85
86
87
88
89
90
91
92
93
94
95
96
97
98
99
100
101
102
103
104
105
106
107
108
109
110
111
112
113
public class ExecutionGraphBuilder {
public static ExecutionGraph buildGraph(...)
throws JobExecutionException, JobException {
return buildGraph(
prior,
jobGraph,
jobManagerConfig,
futureExecutor,
ioExecutor,
slotProvider,
classLoader,
recoveryFactory,
rpcTimeout,
restartStrategy,
metrics,
-1,
blobWriter,
allocationTimeout,
log);
}
/**
* Builds the ExecutionGraph from the JobGraph.
* If a prior execution graph exists, the JobGraph will be attached. If no prior execution
* graph exists, then the JobGraph will become attach to a new empty execution graph.
*/
@Deprecated
public static ExecutionGraph buildGraph(
@Nullable ExecutionGraph prior,
JobGraph jobGraph,
Configuration jobManagerConfig,
ScheduledExecutorService futureExecutor,
Executor ioExecutor,
SlotProvider slotProvider,
ClassLoader classLoader,
CheckpointRecoveryFactory recoveryFactory,
Time rpcTimeout,
RestartStrategy restartStrategy,
MetricGroup metrics,
int parallelismForAutoMax,
BlobWriter blobWriter,
Time allocationTimeout,
Logger log)
throws JobExecutionException, JobException {
checkNotNull(jobGraph, "job graph cannot be null");
final String jobName = jobGraph.getName();
final JobID jobId = jobGraph.getJobID();
final FailoverStrategy.Factory failoverStrategy =
FailoverStrategyLoader.loadFailoverStrategy(jobManagerConfig, log);
final JobInformation jobInformation = new JobInformation(
jobId,
jobName,
jobGraph.getSerializedExecutionConfig(),
jobGraph.getJobConfiguration(),
jobGraph.getUserJarBlobKeys(),
jobGraph.getClasspaths());
// create a new execution graph, if none exists so far
final ExecutionGraph executionGraph;
try {
executionGraph = (prior != null) ? prior :
new ExecutionGraph(
jobInformation,
futureExecutor,
ioExecutor,
rpcTimeout,
restartStrategy,
failoverStrategy,
slotProvider,
classLoader,
blobWriter,
allocationTimeout);
} catch (IOException e) {
throw new JobException("Could not create the ExecutionGraph.", e);
}
// set the basic properties
executionGraph.setScheduleMode(jobGraph.getScheduleMode());
executionGraph.setQueuedSchedulingAllowed(jobGraph.getAllowQueuedScheduling());
try {
executionGraph.setJsonPlan(JsonPlanGenerator.generatePlan(jobGraph));
}
catch (Throwable t) {
log.warn("Cannot create JSON plan for job", t);
// give the graph an empty plan
executionGraph.setJsonPlan("{}");
}
// ...
// topologically sort the job vertices and attach the graph to the existing one
List<JobVertex> sortedTopology = jobGraph.getVerticesSortedTopologicallyFromSources();
if (log.isDebugEnabled()) {
log.debug("Adding {} vertices from job graph {} ({}).", sortedTopology.size(), jobName, jobId);
}
executionGraph.attachJobGraph(sortedTopology);
if (log.isDebugEnabled()) {
log.debug("Successfully created execution graph from job graph {} ({}).", jobName, jobId);
}
// ...
return executionGraph;
}
}

Summarry

  • ExecutionGraph是JobGraph的並行化版本,是調度層最核心的數據結構
  • ExecutionGraph代表運行時的執行計畫,包括Task並行、連接、中間結果的維護